Soil texture refers to the amount of the sand, silt, and clay mixed in it in different proportions. This proportion influences almost every physico-chemical characteristic of the soil and its uses. Soil texture influences drainage and percolation of water, water holding capacity, circulation of air and gaseous exchanges, retention of nutrients in different layers, microhabitat of soil organisms and many more other aspects. Major soil texture classes are Sandy, Loam, Clay, Loamy Sand (Silt), Sandy Loam, Silty Loam, Sandy Clay Loam, Silty Clay Loam, Clay Loam, Sandy Clay and Silty Clay.
We can easily examine the soil texture in the field and can primarily determine the texture of a sample at the site of sampling itself. For accurate determination of soil texture we can later on bring the soil sample to the lab. By examining different soil samples in an area one can prepare map of soil texture of the referred landscape. The knowledge of soil texture of an area would help understanding the adaptation of plants and agriculture varieties, cropping pattern and water & nutrient status as well.
There are various simple means to examine the soil texture in the field. For example, squeezing the wet soil in hand, making a soil ball and throwing it on a hard surface or crushing the ball, pushing the wet soil into a ribbon form between fingers, rubbing it etc. Here we are discussing some methods of examining the soil texture by using our hand.
â— Soil texture chart
â— khurpi or trowel
Stage One - Soil Ball Test:
1- Collect the soil sample from different horizons of a soil profile. Mark the samples with the profile code and horizon code, depth, date & time.
2- From this take a handful of soil (about 25-50 grams) and spread the soil onto a tray and remove any pebbles and visible plant material like roots etc.
3- There might be lots of lumps and clumps (aggregates) of soil particles, these needs to be broken apart so that you can examine the soil texture conveniently.
4- Take a handful of soil and wet it slowly and gradually until it becomes like moist putty. Now shape this wet soil into a ball (see picture).
5- If the wet soil does not get shape of a ball that means it is very sandy soil.
6- If the soil sample can be shaped as ball then go for next stage test.
Stage Two - Ribbon Shape Test:
1- Take the wet soil ball and gently push it into a ribbon between your thumb and forefinger (see picture for help)
2- If the soil does not make ribbon and get broken down or fall apart that means it is Loamy Sand or Silt.
3- If the soil does form a ribbon you just keep pushing the soil out until the ribbon breaks from its own weight.
4- If the ribbon breaks into pieces less than 2.5 cm length then it is ‘weak ribbon’, if it breaks into 2.5 to 5.0 cm pieces then it is ‘medium ribbon’ and if it breaks into more than 5 cm pieces then it is ‘strong ribbon’.
Stage Three - Rubbing Test:
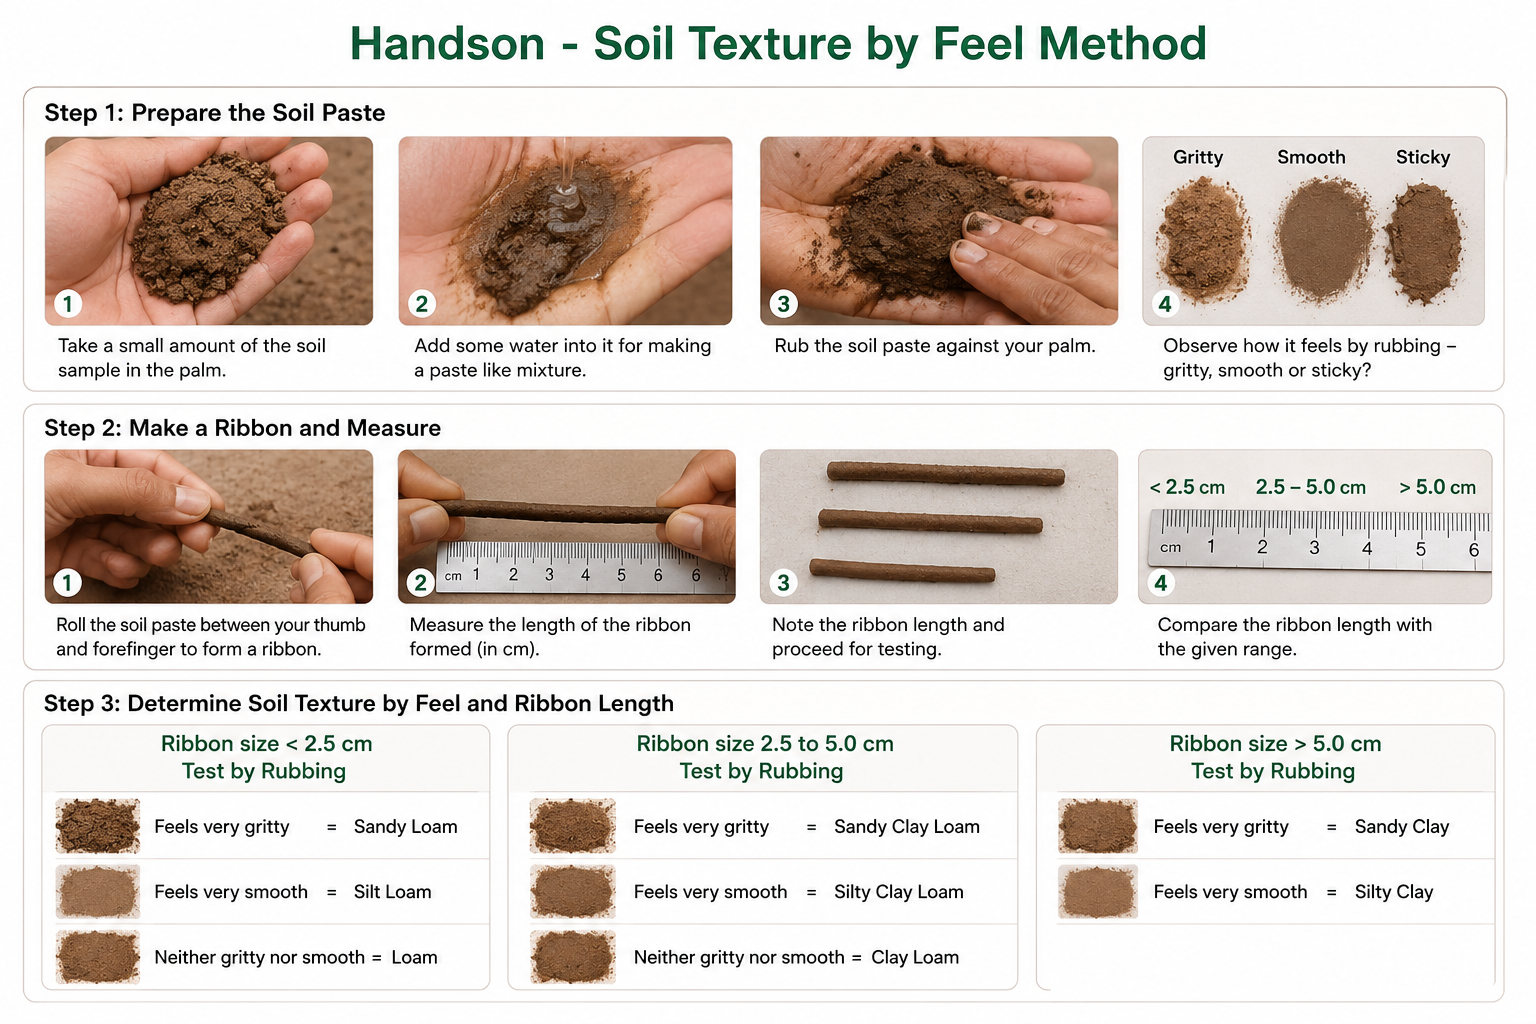
1- Take a small amount of the soil sample in the palm and add some water into it for making a paste like mixture.
2- Using your finger rub the soil paste against your palm.
3- Find out how it feels by rubbing the soil paste – gritty or very smooth or sticky?
4- Derive inferences of the soil texture types based on the respective length of ribbon formed and rubbing test -
For ribbon size less than 2.5 cm, test by rubbing -
1- Whether the soil feels very gritty? If yes then it is ‘Sandy Loam’;
2- If the soil feels very smooth then it is ‘Silt Loam’,
3- If the soil neither feels gritty nor very smooth then it is ‘Loam’.
For ribbon size between 2.5 to 5.0 cm, test by rubbing -
1- Whether the soil feels very gritty? If yes then it is ‘Sandy Clay Loam’;
2- If the soil feels very smooth then it is ‘Silty Clay Loam’,
3- If the soil neither feels gritty nor very smooth then it is ‘Clay Loam’.
For ribbon size more than 5.0 cm, test by rubbing -
1- Whether the soil feels very gritty? If yes then it is ‘Sandy Clay’;
2- If the soil feels very smooth then it is ‘Silty Clay’,
Record the soil texture test results in the designed table or data format. A sample data table is given for example –
|
Site Details Place, geographical location, land use (viz. agriculture land, query, under construction , orchard, grassland, forest, barren land, river side, flood plain, pastureland, roadside, wetland, garden etc). |
||||||||||||
|
Soil Horizon |
Depth of the Soil Horizon (cm) |
Soil Texture Class (Mark in the appropriate Box) |
||||||||||
|
Sandy |
Loamy Sand |
Sandy Loam |
Silt Loam |
Loam |
Sandy Clay Loam |
Silty Clay Loam |
Clay Loam |
Sandy Clay |
Silty Clay |
Clay |
||
|
O |
||||||||||||
|
A |
||||||||||||
|
B |
||||||||||||
|
C |
||||||||||||
â— Present your results in the form of numerical data in the form of quantitative and/or qualitative characteristics. Various interpretations can be done through mathematical and/or statistical calculations.
â— Photographic evidences of the landscape surrounding the sampling site will be useful for further reference.
â— Texture classes of soil
â— Classification / Categorization of soil based on texture
â— Observe seed germination of different plant species in relation with soil texture classes.
â— Observe and experiment to understand the relation between soil texture and water movement (Drainage, percolation, water holding capacity).
â— Observe the conditions of soil erosion in your area in reference to existing soil texture types and try to find remedial measures for it.
â— Try to find out interrelationship between different soil textures and associated plant species growing in the area.